Friday 21 October 2016

Creating like crazy

Five on Friday

CREATING LIKE CRAZY!

Great to be joining Amy from Love Made My Home11 and all the lovely bloggers from 'Five on Friday' again after a couple of weeks break from posting. 

I've had been a very busy time creating lots of paper crafting projects as well as finding a new job and dealing with a boiler that is rebelling! (Currently no heating!)

So here are five of the things I've been up to. Firstly (and I meant to post this on 'Wicked Wednesday') I make Halloween boxes for friends / their children / colleagues etc. Sometimes I make them to raise a little money for charity.

1. Halloween boxes

Frankie guarding the treats!

Batty boxes


The boxes are made with a fry box die (links below) and various stamps and punches. I love the Frankenstein - or Frankie as I like to call him - as he dances to the tune of 'Monster Mash'. Some of you may remember the song from many moons ago. (Now I'm showing my age! lol)


2. Card Party


A friend hosted a 'card party', as we call it, last weekend where she invited some friends round for an open house. (Thank you so much Sharon.) It was lovely to be able to meet people and sell some of my creations. It had taken me weeks to prepare and a manic week or so just before the card party to make extra items. I was so thankful for my friend Jan Doling for helping with essential last minute tasks and being a general superstar. Those of you who are crafters know how long it takes to make handmade items! Next creative dash is for a local school Christmas Fayre at the beginning of December.


3. Birthday boxes


40 birthday boxes


From the card party I had a few orders and the first was for 40 birthday boxes! Really liked the way they turned out but they did take over 12 hours to make. I used a die for the main part of the box (retired from SU) then made the end pieces. So that is 40 main pieces, 80 end pieces (individually cut and scored and 3 pieces of tape on each one - that's 240 pieces of double sided tape), 80 pieces of decorative paper - front and back and 40 decorative elements. I was happy when these were completed! :-)


4. Baby Cards


One design for baby cards

I've had lots of requests for baby cards recently - mainly boys. This is one design I have made based on a card by Clearly Besotted on Pinterest. I will be making some different ones this weekend to add to the collection. Hopefully I'll be able to show them next week.


5. Sticky note holders


Love that I can personalise projects with nicknames.

Useful little holders - great near a phone to take messages.


I made these little sticky note holders for two friends. They are based on ones originally made by Jan Brown. The holders stand up with a tent fold in the middle and have a little pouch on the back. I'd added a mini calendar and some decorative paperclips into the pouch.


I have also been creating projects for Crafter's Companion Design Team in the last couple of weeks. They should be popping up on HOCHANDA in some of the Crafter's Companion 11th birthday shows this week. I'll probably be putting them up here next week.


That's it for this week. I'm off to plan and make my next lot of crafty projects. If you would like me to show you how to make a particular project then please leave a comment below. Have a fabulous weekend, and for my teacher friends, have a great half term.

Jan x


Products used: Unfortunately some of the products used are now retired including the bigz die used to make the body of the birthday boxes and the Fry box die used to make the Halloween treat boxes. Both were by Stampin Up! but they have other dies available for treat boxes so it's worth checking out their site. Coloured card is from Hobbycraft, matt black card from Crafter's Companion, coloured paper is from Trimcraft 'Bright Sparks' collection. Mini pens are from Wilko and sticky notes from Staples. Stamps and dies for the baby cards are from Clearly Besotted however they are taking a break and are closed until the new year. Their products can be found in a number of other crafting websites.




Wednesday 5 October 2016

Put a Peg on it!


Wicked Wednesday Week 1

PUT A PEG ON IT!

Welcome to week one of Wicked Wednesday! For the next four weeks I shall be showing some fun Halloween projects.


Witches hats on mini pegs

These fun witches hats are a great way to seal a treat bag or box or simply to peg around the house at Halloween time. They could even be pegged onto a treat in a lunch box!

The original idea was by Janet Baker. Click on the YouTube link here for a tutorial:

Some of the Stampin Up punches in the video are now sadly discontinued but the hats can still be made if you have circle dies and a die with a triangular point eg. a star shape, or you can create your own from measuring out a triangle with a ruler or squared paper as a template.

For the bow I have used the 'Put a bow on it' die by Lawn Fawn. Alternatively you could make and use a ribbon bow and use glue dots to attach it.


Bat on a peg

I love this bat by Elizabeth Craft Designs. I couldn't resist putting him on a peg as well. Again, great to use on treat bags etc. He can also be glued to a stripy straw and popped into mini milk bottles for a Halloween party table. He is also great for sticking to a card or a treat box.
You could make it a girl bat by using the bow tie as a hair bow.

There will be another 'Wicked Wednesday' next week and also I'll be joining the 'Five on Friday' bloggers this Friday. Hope you can pop back then.

Enjoy the rest of your week.

Product list and links: 
Matt black card, grey and red cardstock, craft card, patterned paper and mini pegs from local craft store, Midnight the Bat die, the stamp used is by AmyR but is discontinued but other Halloween stamps can be found at Crafts U Love, Seven Hills Crafts and Dies to Die For.


Saturday 1 October 2016

Mini Treat Pouch


Mini Treat Pouch


Happy Saturday! Today is going to be the last of the mini treat bags series using  6 x 6 inch paper. This is a popular treat pouch and can be made with any size square paper. There are many different examples of this style out there but here I'm showing the basic folds.


Step 1


Step 1: Fold the paper diagonally and crease with a bone folder if the paper if the paper is quite thick.


Step 2

Step 2: With the open point at the top, take one of the bottom corners and bring across so that the paper is as straight as possible beneath the point at the top. Press down the fold firmly.


Step 3


Step 3: Bring up the opposite side so that it lays across the horizontal part of the fold made in step 2. Crease the fold firmly.


Step 4


Step 4: Bring down the top layer of paper from the top triangular piece and fold over the top of the previous folds. Crease the fold firmly.


Step 5


Step 5: Put your hand inside and gently open out the pouch. it will hold its own shape.

This type of pouch looks particularly good when double sided paper is used.

Decorate and fill with treats.

I really hope you try some of the treat pouches and bags I've shown. I would love to see what you make too.

Have a great weekend - stay warm, I hear it's going to be a chilly one! Autumn (Fall) is definitely here!

JC x


Friday 30 September 2016


Five on Friday

Wow that week seemed to fly by! I'm joining Amy again today from Love Made My Home and all the other lovely bloggers who post there. Please go and visit them - such talented crafters, photographers and interesting people.

I have another little treat bag that can be made in 5 minutes in 5 or less steps with a 6 x 6 inch piece of paper or cardstock. I will post the last one in the series tomorrow as I will be doing something new next week.

Apologies for the lighting in the photos; it's been a really dull day today where I am. Hope it has been brighter wherever you are.


Step 1


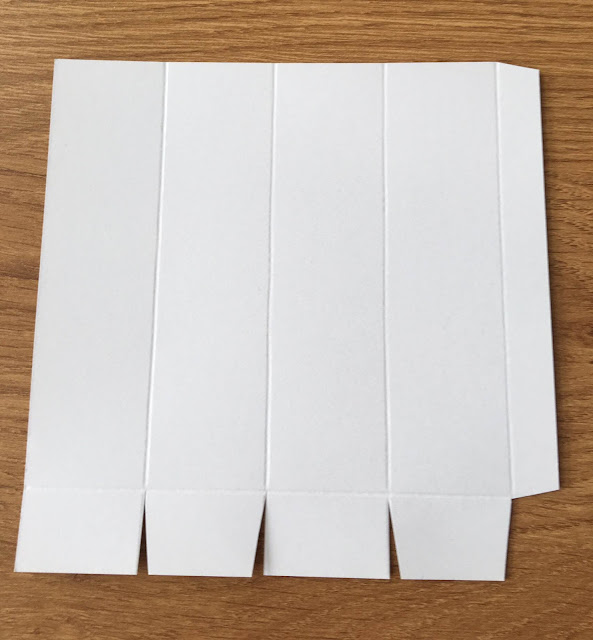
Step 1: Place a piece of 6 x 6 inch paper or card onto a scoring tool and score at 7/8, 2-7/8, 3-3/4 and 5-3/4 inches. ( 2.2, 7.3, 9.5 and 14.6 cm)


Step 2


Step 2: Turn the paper 90 degrees and score at 7/8 inch. (2.2cm)


Step 3


Step 3: Fold on all the score lines. Use a bone folder with thicker paper or cardstock for a crisper fold. Cut into the tabs along the narrow end up to the horizontal fold.

Fold over the skinny tab on the side and add glue or double sided sticky tape. Fold over and join the two long sides of the bag.

Add glue/tape to the bottom tab as shown. Fold in the small tabs, then the larger unglued one before the final glued tab to create the bottom of the bag.


Step 4


Step 4: Push in the sides at the top of the bag and pinch.


Step 5


Step 5: To close the treat bag, punch two holes and add ribbon or twine to tie together or use a stapler or mini clothes peg to keep the goodies inside.

The final size of the treat bag is 2 x 7/8 x 5-1/8 inches (5 x 2.2 x 13cm).


I hope you have a go at this little bag. Like all the others they make great thank you or table gifts or even Advent or Christmas tree gifts.

Have a lovely weekend whatever you are doing. Please drop back to see the last treat pouch tomorrow.

Jan x


Friday 23 September 2016


Five on Friday


Rather late today joining Amy from Love Made My Home today. I've been having a few internet problems this week. My apologies for not answering those of you kind enough to write a comment. Hopefully everything will be smoother this week and I'll be able to reply without problem.

Other news this week - I was very excited to hear that I have been accepted onto Crafters Companion design team. So watch out for some projects using some CC items on the blog in the very near future.

This week for Five on Friday is another in the mini-series of treat bags/boxes using 6 x 6 inch paper. Each project made in five minutes in five or less steps.


Step 1


Step 1: Use a scoring tool to score vertically at 1-3/8, 2-3/4, 4-1/8 and 5-1/2 inches. (3.5, 9.5, 10.5, 14 cm Please note that I have rounded to one decimal point for cm).


Step 2

Step 2: Turn the paper 90 degrees and score at 7/8 inch. (2.2 cm)


Step 3

Step 3: Fold on all the score lines. Use a bone folder/paper creaser for thicker paper or card. Cut on the score lines as shown up to the horizontal score line


Step 4

Step 4: After scoring add adhesive to the thinner vertical tab and one of the tabs below the horizontal line.


Step 5


Step 5: Fold up box, sticking the bottom flap last of all. Pinch in two sides at the top of the box and seal with a peg, staple or punch holes and tie with ribbon.

The finished box is approximately 4-1/8 inches tall and 1-3/8 inches square. This is an ideal little box to hold sweet treats, a nail polish or perhaps a mini bottle of something for a little tipple! I will be putting in an individual sachet of coffee, sugar and little biscuits for small thank you gifts.

Hope you give this a try.

Items used in this project:
Dovecraft basics 6x6 inch paper (please note these colours may no longer be available), bone folder and score board both Stampin Up (order online).
Alternative products: bone folder/paper creaser, score board.

New on the blog
From Tuesday 27th September I shall be starting a new mini-series called 'Tools on Tuesday' covering some essential paper crafting tools, particularly for those who are just beginning to paper craft. Hope you can pop over to have a look. If there is anything in particular you would like to see or know more about, please leave a comment below.

Have a fabulous weekend. J x


Friday 16 September 2016

Five On Friday


I have started this blog to share my love of paper crafting. I aim to regularly share projects as well as tutorials of cards, bags, boxes and tags.

Today I am delighted to be joining in with Five On Friday for the very first time with Amy from Love Made My Home. Please go and visit her website to find more Five posts.


This Friday I am going to start a mini-series making treat pouches/bags using 6 x 6 inch paper in no more than 5 easy steps.


Envelope style treat pouch


Step 1

Step 1. Place a piece of 6 x 6 inch (15 x 15cm) paper on a score board or a paper trimmer. Here I am using a Stampin Up score board but there are many different ones available.

Score the paper at 1-1/2" and 4-1/4". (3.8cm and 10.8cm)


Step 2

Step 2.  Turn the paper 90 degrees and score again at 3/4" and 5-1/4"
(1.9cm and 13.3cm).


Step 3

Step 3. Cut away the four corners between the horizontal and vertical lines.


Step 4

Step 4. Trim off the edges at a slight angle so the treat pocket folds neatly.


Step 5


Step 5. Fold on all the score lines and crease with a bone folder or the edge of a ruler. If you use thinner paper you do not need to use a bone folder, just press the edges down with your fingers. I am using 150gsm paper here.

Apply adhesive to the inside edge of the long central flap and the bottom flap.


Completed envelope treat pouch


Add small treats and seal top either with adhesive or punch a hole in the middle and add ribbon and a label/tag.


Items used in this project:
Dovecraft basics 6x6 inch paper (please note these colours may no longer be available), bone folder and score board both Stampin Up (order online).
Alternative products: bone folder/paper creaser, score board.


Thursday 1 September 2016

Blog under construction


This blog is currently under construction. My hobby and obsession is card making and paper crafting. I will be showing you samples of the projects that I make and also some tutorials for making your own distinctive designs.


Please come back soon. In the meantime I will leave you with a few of my past creations.


(To see a larger image please click on photo).


MFT Gnomes Behaving Badly


Gift tags


I saved my brothers bacon with this one!


Scaredy Cats!


Inspired by Jan Brown's tutorial


Teacher gifts - sticky note holders


For all those hard-working teachers out there!


From one old dinosaur to another!